
Calix E7 Series is an advanced modular access platform that caters to the changing needs of broadband networks. This complete guide intends to give a thorough understanding of the Calix E7 series, bringing out its main features, capabilities, and advantages. It will also discuss E7 series architecture, including its hardware and software components. Besides, this manuscript will investigate deployment scenarios and use cases that make the Calix E7 series an adaptable solution in the realm of service providers. In addition, by exploring technical specifications and practical uses of the product in the real world, network professionals are empowered with enough knowledge to improve their broadband infrastructure through the Calix E7 Series.
What is the Calix E7 and How Does It Work?

Overview of the Calix E7 Platform
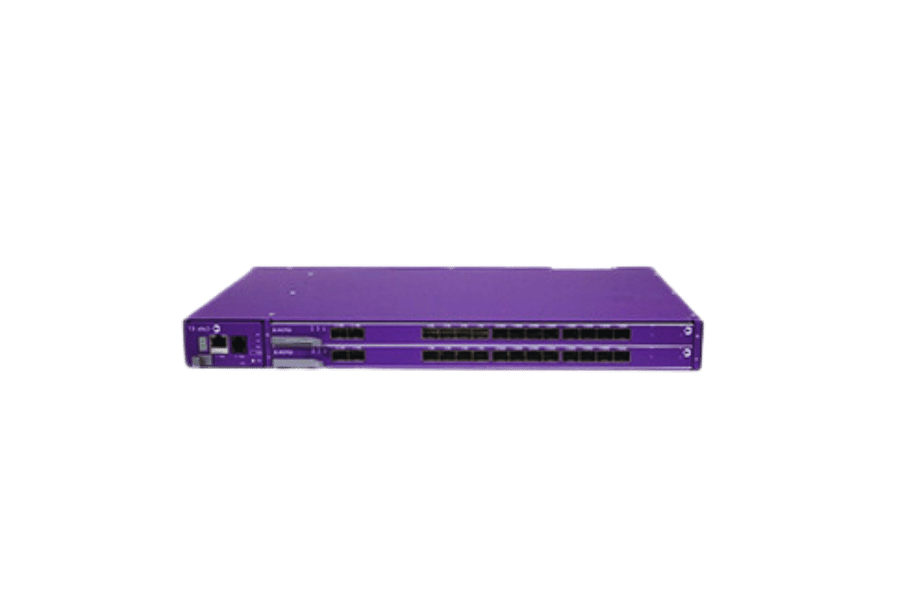
The Calix E7 platform is a modular access system that allows for the provision of world-class broadband services over a highly scalable architecture. It combines both GPON and Active Ethernet technologies to facilitate the transmission of high-speed data, voice, and video services. The system comprises advanced hardware such as E7-2 Ethernet Service Access Node, E7-20 Multi-Terabit System which have multiple interfaces suitable for use with high levels of redundancy. The software module facilitates smooth network management and service provisioning. Through its technological excellence, Calix E7 guarantees best-in-class performance while providing reliability and flexibility required in modern broadband infrastructures.
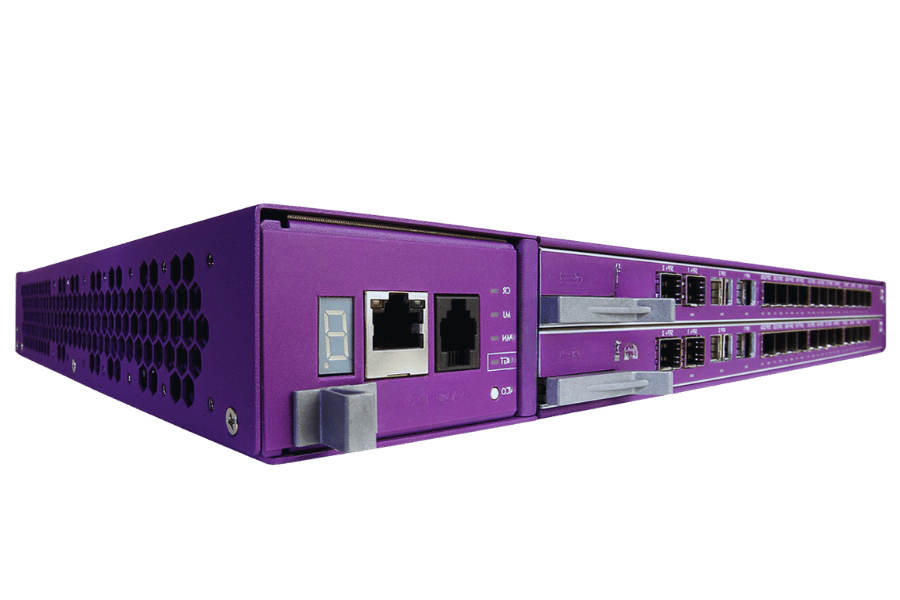
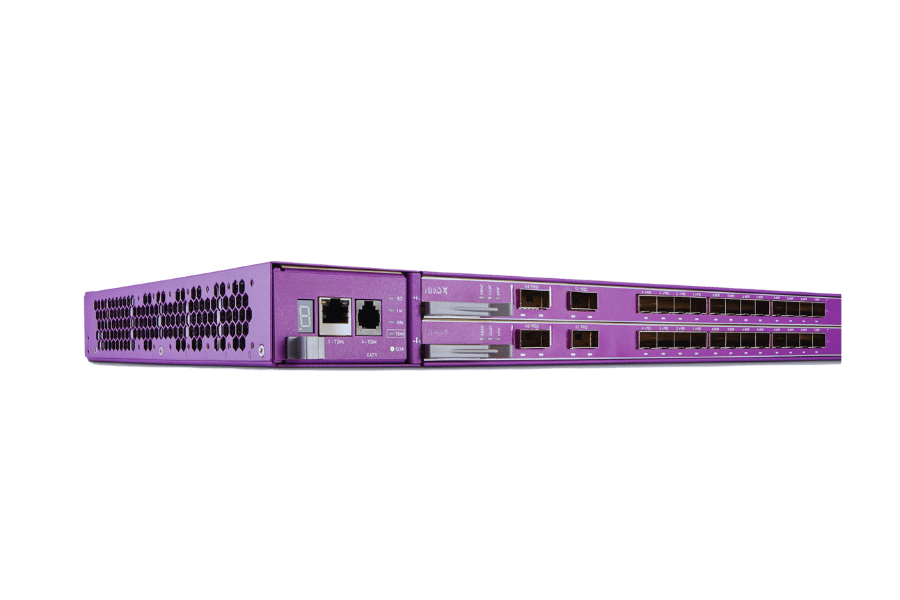
Key Features of the Calix E7-2
- Scalability: Being modular, E7-2 can be used for small or large projects allowing the providers to build their girds on demand.
- Large Capacity: The E7-2 has two slots for line cards which ensures that it can maintain high throughput and thus enable efficient provision of broadband services.
- Multiple Technology Support: It works with both GPON and active Ethernet technologies enabling network designs and service delivery to be flexible.
- Redundancy and Reliability: The E7-2 has redundant power supplies and fan modules to minimize downtime as well as ensure continuous service.
- Advanced Management: Integrated software tools simplify network configuration, monitoring and management, making them more efficient.
- Universal Interfaces: This system supports a wide variety of interfaces, such as Gigabit Ethernet and 10 Gigabit Ethernet, among others, catering to different types of services.
- Energy Efficiency: The use of energy-saving components in the design of the E7-2 minimizes its power consumption hence reducing operational costs.
- Future Proof Design: It is built to take seamless upgrades in stride by incorporating next generation technology into its architectural framework, thereby safeguarding long term investments.
Types of Networks Supported by the Calix E7
The Calix E7 caters for different network types, thus promising to be the most versatile and nimble in a number of deployment settings. The devices have been designed primarily to support Passive Optical Networks (PON) such as GPON (Gigabit Passive Optical Network) and XGS-PON (10 Gigabit Symmetrical Passive Optical Network). This is because they are effective in transmitting high-speed broadband services. Additionally, it supports Active Ethernet networks that facilitate point-to-point connections which are capable of providing robust bandwidths and low latency suitable for business services and critical applications. Service providers can therefore adapt their network infrastructure according to specific needs of individual customers, permitting them to plan their investment in a way that considers future trends.
How to Set Up and Configure the Calix E7-2?
Initial Setup for the Calix E7-2
- Unwrap and Examine: Be sure all parts are there and look for any visible damage.
- Attachment: Use appropriate mounting brackets to affix the E7-2 unit onto a rack.
- Powering: Supply cost-effective, long-lasting power to the E7-2 following the recommended power specifications.
- Grounding: Link it properly to avoid electrical disturbances and ensure safety.
- Interface ports: Connect network cables firmly on the right hubs through which they will be connected to obtain the correct information.
- Configuration access: A laptop or console can be connected through a management port to access the command line interface (CLI).
- Initial Configuration Setup: The Initial configurations including IP address, Subnet mask, and default gateway should be set up using CLI.
- Firmware Updates: Search for new firmware updates that might be needed in its installation.
- Validating Set Up : One has to run basic operational tests so as to confirm that everything is okay with the connections made by him/her during the installation process.
- Monitoring: Connect this system with the respective Network Management System (NMS) for continuous monitoring and managing of E7-2.
Configuring Network Interfaces
- Access CLI: Connect to the E7-2 by management port and enter Command-Line Interface (CLI).
- Enter Configuration Mode: Use the command ‘configure’ to get into global configuration mode.
- Choose Interface: Select the network interface that needs configuring and then enter into specific interface mode with ‘interface {interface-id}’ command.
- Assign IP Address: Give an IP address to chosen interface via ‘ip address {ip-address} {subnet-mask}’.
- Enable Interface: Make sure that this interface is enabled by typing ‘no shutdown’.
- Validate Configuration: To check if all settings have been applied on an interface, use the command ‘show running-config’.
- Save Configuration: Save the configuration in startup-config memory using the following command – write memory.
These steps allow for the successful setup of Calix E7-2 network interfaces, which should result in the best performance plus connectivity.
Connecting ONTs and OLTs
- Prepare the Equipment: First make sure that all the necessary tools are available and compatible, such as Optical Network Terminals (ONTs) and Optical Line Terminals (OLTs).
- Connect Fiber Optics: Next, connect the fiber optic cable between the OLT and ONT; this will create a primary link for data transmission.
- Power On Devices: Turn on and initialize both ONTs and OLTs. Check for operational status indicator lights if any.
- Configure OLT: Log into the OLT via CLI or web interface, enter configuration mode, then define service profiles as well as VLANs for each connected ONT.
- Assign ONT IDs: Every single ONT requires an ID to identify it uniquely. Assign these IDs within its configuration on the OLT so that specific customer accounts or locations can be associated with them.
- Configure ONTs: Go through individual ONT configurations from within your chosen management system like EMS/NMS/UNI or using SNMP commands directly against their MIB objects…etc., set up various parameters of services like IP address assignment methods; Bandwidth Profiles; Service Activation etc..
- Test Connectivity: Perform some basic tests to ensure a stable connection between OLT and all connected ONTs is achieved, meeting minimum performance requirements. Use ping tests along with throughput assessment tools.
- Monitor & Manage : Keep monitoring both OLTs and ONTs continuously using network management systems (NMS). This enables early detection of potential problems which greatly helps in effective network management.
What are the Common Issues with the Calix E7-2 Shelf?
Troubleshooting Network Interfaces
Common problems with network interfaces on the Calix E7-2 Shelf occur when:
- Link Fails: Be sure to establish physical connections well and ensure cables are not broken. Also, check if both OLT and ONT ports are in right operational state.
- Configuration errors: Verify that interface configuration settings within OLTs (Optical Line Terminals) or ONTs (Optical Network Terminals) are properly assigned and active.
- Port Status: LEDs indicating port statuses on the E7-2 Shelf should be looked at so as to identify error indicators like alarms or strange blink patterns, which could mean that there is an issue somewhere.
- Interface mismatch: Check whether speeds of interfaces between devices connected together match their duplex modes or not.
- SFP Modules: You need to check SFP modules for compatibility; make sure they have been inserted correctly into ports and also confirm if they work fine through diagnostic tools.
- Firmware Problems: Outdated firmware can cause incompatibility as well as performance issues; therefore, it’s necessary for you to update your firmware both on OLTs and ONTs.
Troubleshooting these common problems systematically will help keep the network running smoothly.
Identifying Problems with SFP Modules
There exist various steps, which are necessary for identifying problems with Small Form-factor Pluggable (SFP) modules on the Calix E7-2 Shelf:
- Module Seating: Confirm that the SFP module is correctly inserted and secured in its slot. Inconsistent connection can occur if a module is loose.
- Compatibility Check: Make sure that the SFP module is compatible not only with the E7-2 Shelf but also with other connected devices. Malfunctioning or incorrect modules may fail entirely or work improperly.
- Visual Inspection: Examine the SFP module for any observable damages such as bent pins, cracks on its body or other physical deformities.
- LED Indicators: See if there are any LED lights showing near ports where SFPs are connected; they indicate link status and may point out faults quickly.
- Temperature and Power Levels: Monitor temperatures at which Small Form-factor Pluggable devices operate as well as their power consumption using diagnostic tools. Unusual temperature readings can imply deeper problems while abnormal power levels might reveal some hidden issues too.
- Firmware Updates: Ensure that both the firmware of an SFP module itself and Calix E7-2 Shelf are updated to the latest versions available from the manufacturer’s site, respectively. Mismatched firmware causes performance degradation or complete failure of modules sometimes.
- Loopback Testing: Carry out loopback tests so as to ascertain whether these units have been functioning properly. This enables one to identify whether the problem lies within the module itself or somewhere along the connection path, thus making it easier for one to isolate fault(s) during troubleshooting exercise(s).
By following these measures, one could effectively locate and fix troubles concerning small form factor pluggable transceivers thereby ensuring continuous network reliability and performance.
Resolving Fiber Optic Connection Issues
To solve problems with fiber optic connections, you need to follow some rules. Here they are:
- Monitor physical connection – do not forget to check all the cables whether they are connected firmly and clean. It’s easy to fix the problem if you make sure that connectors have been inserted correctly into adapters, or simply clean them up.
- Check for signal loss – measure optical power levels at different points using an optical power meter. You will find out whether there is any significant signal loss caused by dirty/damaged connectors; bent fibers or poor splices.
- Use OTDR testing – An Optical Time-Domain Reflectometer can be utilized for this purpose too. What it does is help identify faults along the fiber optic cable, hence locating breaks/splices/other anomalies within the same.
- Incompatible equipment checking – Ensure that all components of your optical network such as cables/connectors/transceivers etc., are compatible with each other and conforming to required specifications.
- Verify network configuration – Make sure that network devices have been configured correctly for fiber optic connections. Misconfiguration can either result into no connectivity or sub-optimal performance.
- Watch environmental factors – Pay attention to things like temperature changes/physical stress/moisture, which may affect performance levels of fiber-optic communication links due to their sensitivity therewith.
In conclusion, fixing fiber optic connection problems requires careful examination of physical connections, measurement of optical performance and validation of network configurations.
Which Calix E7-2 Line Cards Should You Use?
Features of the E7-2 GPON-8 Card
The E7-2 GPON-8 card is designed to enhance network performance and provide a robust solution for fiber-to-the-home (FTTH) applications. Some of its key features include the following:
- 8 Gigabit passive optical network ports: Each port can support up to 64 subscribers which makes it possible for this device to be deployed densely and utilize resources effectively.
- 1 GbE and 10 GbE Uplinks: Connections that are flexible in terms of scalability when it comes to backhaul are made easy by these interfaces hence different capacities according to various architectures will be accommodated.
- Advanced QoS: Diverse traffic types must attain the best performance levels through service prioritization through the use of more complex mechanisms, which has been implemented as advanced Quality Of Service (AQoS).
- Remote Management: Aiding efficient administration as well as troubleshooting processes within networks, this component provides an all-inclusive remote management capability based on the Calix Management System (CMS).
- Layer 2 and Layer 3 Support: This feature allows users with E7-GPON cards greater flexibility in designing their network since they support both switching at layer two as well as routing protocols found under three layers.
By utilizing these capabilities, it becomes possible, even today, for fiber optic networks to perform consistently without fail at high speeds, thanks mainly to the E7-2 GPON-8 card.
Comparing Different Line Cards Available
While choosing the Calix E7-2 line card to use, it is important to assess what each card can do and how well it performs. Here is a brief look at some of the alternatives:
E7-2 GPON-8 Card
- Ports: 8 ports for GPON.
- Uplinks: 1 GbE and 10 GbE.
- Subscribers per Port: Allows up to 64 subscribers on every port.
- Management: Can be remotely managed with the help of Calix Management System (CMS).
- Networking: Supports Layer 2 and Layer 3.
- QoS: More advanced quality of service mechanisms.
E7-2 VDSL2-48 Card
- Ports: 48 ports for VDSL2.
- Uplinks: four times one-gigabit Ethernet or two times ten-gigabit Ethernet.
- Subscribers per Port: Up to 96 subscribers supported.
- Management: Powerful diagnostic tools; fine-grained vectoring.
- Networking: Primarily designed for copper infrastructure.
- QoS: Comprehensive support for high-speed DSL services.
E7-2 10GE-4 Card
- Ports: four times ten gigabit Ethernet ports.
- Uplinks: N/A (Uplink is integrated with the ports).
- Subscribers per Port: It varies according to network configuration.
- Management: Seamlessly integrates with Calix Management System (CMS) .
- Networking : High-speed optical transport; aggregation.
- QoS : Optimized for high bandwidth; low latency services.
One should choose a line card depending on what their network requires in terms of number density among other factors such as type of infrastructure used and required uplink capacity. For FTTH applications, the E7 -2 GPON -8 card would be my recommended choice due to its large numbered ports and advanced features. Conversely, if you’re working with copper-based networks, then I would advise using E7 -2 VDSL2 -48 since it supports higher subscriber density per port. However, if you’re looking for high-capacity optical transport, then E7 -2 10GE -4 is the most suitable option.
Choosing the Right Line Card for Your Network Needs
When choosing the right line card for network requirements, it is important to look at some factors:
Subscriber Density and Scalability:
- Determine how many subscribers you plan to support now or in future. With each port of E7-2 GPON-8 card having a capacity of up to 64 subscribers, this line card suits best in high population areas.
- On copper based networks that require higher scalability, E7-2 VDSL2-48 card can support a maximum of 96 subscribers per port.
Type of Infrastructure:
- Find out if fiber or copper infrastructure is more prevalent within your network. Designed specifically for Fiber-to-the-home (FTTH) applications, E7-2 GPON-8 ensures strong and consistent performance.
- However,E7-2 VDSL2-48 targets optimization of existing copper infrastructures while delivering DSL services at high speeds.
Uplink Requirements and Bandwidth:
- Check what uplink capabilities are necessary to meet bandwidth demands in your network. In its ports, E7-2 10GE-4 integrates the uplinks hence applicable for high capacity optical transport and aggregation with minimum latency as well as increased bandwidth.
Service Quality(QoS) and Management:
- Consider remote management effectiveness alongside advanced QoS mechanisms so that efficiency in operation can be achieved.All three cards, namely GPON-8,VDSL2-48, and 10GE-4, have seamless integration with Calix Management System(CMS).They also provide wide-ranging QoS features that facilitate the prioritization of different traffic types, especially those considered critical.
Matching card specifications with the current/future needs of a network guarantees top performance levels besides enhancing scalability plus reliability.
How to Maintain and Upgrade Your Calix Network?
Routine Maintenance Tips for the Calix E7
What is the significance of routine maintenance?
- It guarantees the reliability and efficiency of a network.
Which tasks fall under preventive maintenance generally?
- Updating firmware regularly.
- Physical connections inspection.
- Monitoring system logs frequently.
How frequent should firmware updates be carried out?
- Every three months or immediately when new updates come out.
What ought to be checked during physical connections inspection?
- Look for broken cords, unfastened links, and how clean optical ports are.
In what way can system logs assist in maintenance?
- They help in early detection of trends and potential problems.
What is the work of Calix Management System (CMS) in maintenance?
- It enhances remote control and diagnosis.
Upgrading Firmware and Software
What is the importance of upgrading firmware and software?
- It is important because these updates improve security, add new features, and enhance system performance.
What are the precautions to take before upgrading?
- Before you proceed with any upgrade, backup your current configurations and ensure that there is a possibility of network downtime.
How do I perform a firmware upgrade?
- Firstly download the newest version from Calix support website. Then enter into management interface area where you will find out more about how it works through following some provided procedures for upgrading as shown in documentation.
How can I perform a software upgrade?
- Use CMS (Calix Management System) which pushes this new softwares into relevant devices while checking compatibility and proper versioning.
What comes after doing upgrades?
- Make sure all equipments are functioning as expected, test connectivity between them and go ahead to validate if features were indeed upgraded or not.
By following these rules, it will keep your Calix E7 network secure, updated and efficient.
Scaling Your Calix Network Infrastructure
Scaling the infrastructure of your Calix network requires planning and execution that is strategic enough to accommodate increasing consumer needs and improved service capabilities.
Understanding Network Demand
- Conduct comprehensive evaluations for both current as well as projected usage levels of networks.
- Evaluate parameters such as bandwidth requirements and performance metrics of networks.
Implementing Effective Network Design
- Use designs that allow incremental expansion through modules in networking systems.
- Implement redundancy measures in addition to load balancing which ensures reliability in networks.
Leveraging Advanced Technologies
- Bring into line higher-capacity technologies together with those which offer better performance like GPON, NG-PON2 or 10G PON.
- For easy management that is flexible scalable as well efficient use software-defined networking (SDN) along with network function virtualization (NFV).
Optimizing Resources and Monitoring
- Analyze network performance on a regular basis to establish where there are bottlenecks so that resources can be optimized.
- Employ tools for managing networks proactively which help predict growth thus ensuring efficient control over it.
By following these steps, one will be able to scale his/her Calix network infrastructure effectively thereby meeting the growing demand and providing more advanced services.
Reference Sources
Frequently Asked Questions (FAQs)
Q: What is the Calix E7 Series?
A: The Calix E7 Series is a flexible and scalable access system for telecommunications networks that provides the entire range of IP access services through GPON and point-to-point Ethernet networks. A number of configurations are supported to meet different network requirements.
Q: What are the components of the Calix E7 Series?
A: The chassis, line cards, and supporting modules form the core components of the Calix E7 Series. For example, the 1RU chassis Calix E7-2 can accommodate various line cards, including Calix E7-2 GPON-8 Line Card, for different types of access services.
Q: Please provide details about the Calix E7-2 GPON-8 Line Card.
A: Each card has eight ITU G.984-compliant GPON OLT ports that subtend off the main chassis. It offers a complete spectrum of IP access services per card, supporting up to 256 ONTs per OLT port.
Q: How does card capacity affect performance?
A: Eight GPON or Ethernet ports per card and per E7-2 1RU chassis allow high-density service delivery and efficient utilization of network resources.
Q: What network services does the Calix E7 support?
A: The Calix E7 supports GPON as well as point-to-point Ethernet networks, which enable telecom operators to deliver internet, voice, and video services over fiber/copper cables in their IP-access offering breadth.
Q: How does inventory management work with this series?
A: Inventory management features inbuilt into the powerful system ensures easy tracking and maintenance of network components thus optimizing their performance reliability – this is what we call robust inventory management features included in calx e seven series.
Q: What are some benefits offered by using an E7-2 GPON-8 Line Card?
A:The eight GPON OLT ports on each card support complete spectrum of IP access services. This card is designed for high density environments that allow operators to efficiently manage many connections while maintaining consistent service quality.
Q: How does each OLT port perform in the Calix E7-2 GPON-8 Line Card?
A: Each OLT port has dedicated capacity to handle up to 256 ONTs thus stable and high performance service delivery for multiple users.
Q: Are there any handling requirements for the Calix E7 Series chassis and line cards?
A: Yes, specific guidelines provided by Calix should be followed when handling or installing these devices so as not only to maintain safety but also achieve optimal performance; it is important that one properly handles, grounds, and connects such components like chassis just as copper cables which are vital for proper operation.
Q: Can I use the Calix E7 series with my current network setup?
A: The design flexibility of this product allows its seamless integration into various existing infrastructures without necessarily requiring telecom operators’ heavy investment in terms of overhauls; different types of line cards together with modules can also be used thereby enhancing network performance.